Interface & Controls
Step into the core of your 3D journey! This section is designed to guide you through the interface and controls of our platform, ensuring you can easily navigate and interact with your and other Spaces.
Whether you’re on a desktop, tablet, or mobile device, our interface is built to offer a seamless experience across all devices. From exploring 3D models to engaging with interactive elements, you'll learn how to make the most of the controls at your fingertips.
In this guide, we’ll cover everything from basic navigation to advanced features, helping you feel comfortable and in control.
Interface
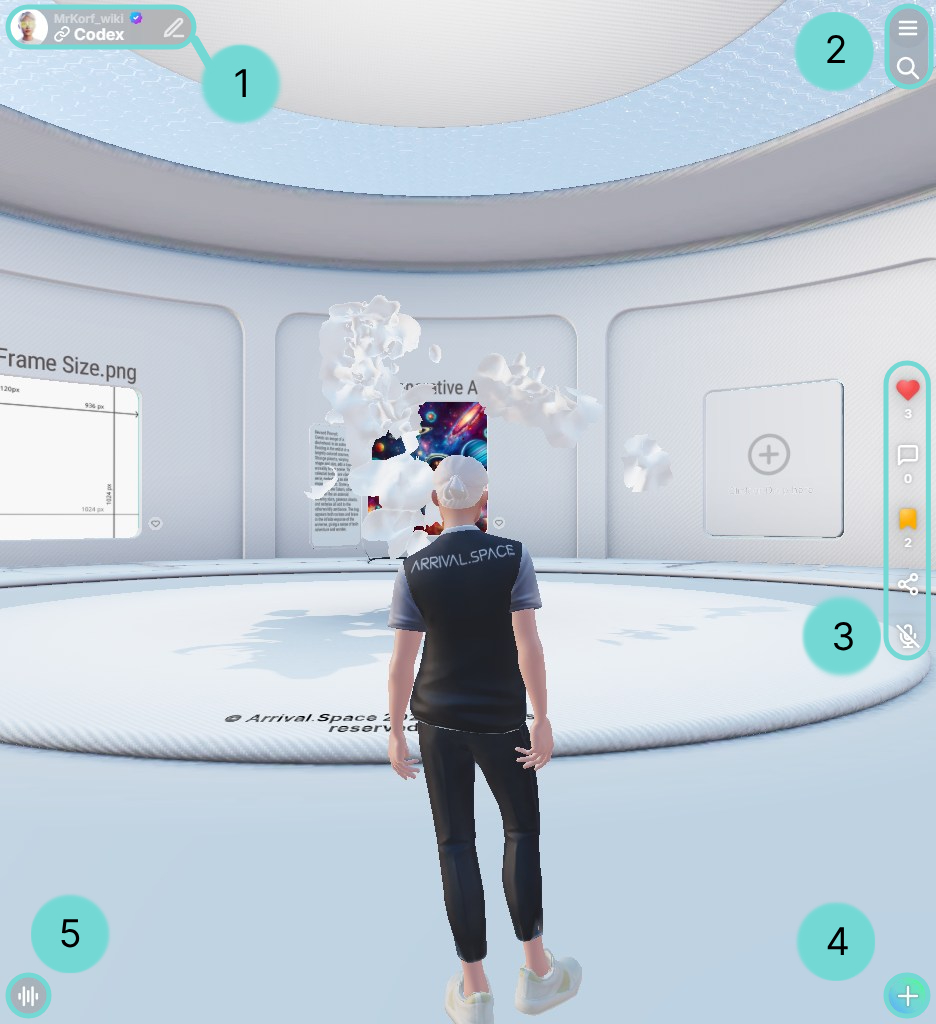
1Owner Badge
The owner badge is used to show the creator of the Space and all important information at a glance.
Clicking on the profile picture opens the Profile Index Card. There you will find contact links such as websites or social media links. More detailed information follows in section Profile Index Card.
Click on the Space name or the username to open the Space description.
EditThe Edit Icon is only displayed in your own Spaces, as you can use it to open the Space Edit UI to customize your Space.
2Burger Menu & Search
The Burger Menu, represented by three horizontal lines , provides access to additional features and settings. Tapping or clicking this icon will open the menu. Once open, the icon transforms into an arrow 7 , indicating that tapping or clicking it again will close the menu.
Underneath a Button is placed, which will open the side panel search.
3Social Bar
The Social Bar provides quick access to interact inside the current Space: liking, bookmarking, sharing, and opening the public comments & Voicey's.
LikeTap this icon to show your appreciation for the space.
CommentClick this icon to open the public comments & Voicey's. Share your thoughts, opinions, or react to messages and voice notes from others.
BookmarkSave spaces for later access. This includes link-only and encrypted spaces.
ShareDistribute the Space with others via social media, QR code, direct link, or embed it into your website using an iframe.
MutedThis icon shows your current state of your microphone and allows you to change it by pressing it from off to on and the other way round.
UnmutedAs soon as it is enabled everyone, which is inside the Space, will hear you. It isn't disabled after changing a room.
Sometimes it is necessary to make additional changes that you can use the microphone. If something does not work, you can find help here.
4Action Button
With the Action Button you can easily create a new Space, place a dynamic Gate, record a Voicey, add Annotations or place additional GLB Models. More detailed information follows in sections Content, Edit Gates, 3D Voicey's, Sound and Annotation.
5Mr. Korf -Pro
Mr. Korf is your virtual support. He can generate and set objects, change settings, as well as answer questions. Hold the Button to talk to him. A short click/touch opens an input field.
He is only available for the Pro Subscription.
You can find more information in the section Mr. Korf.
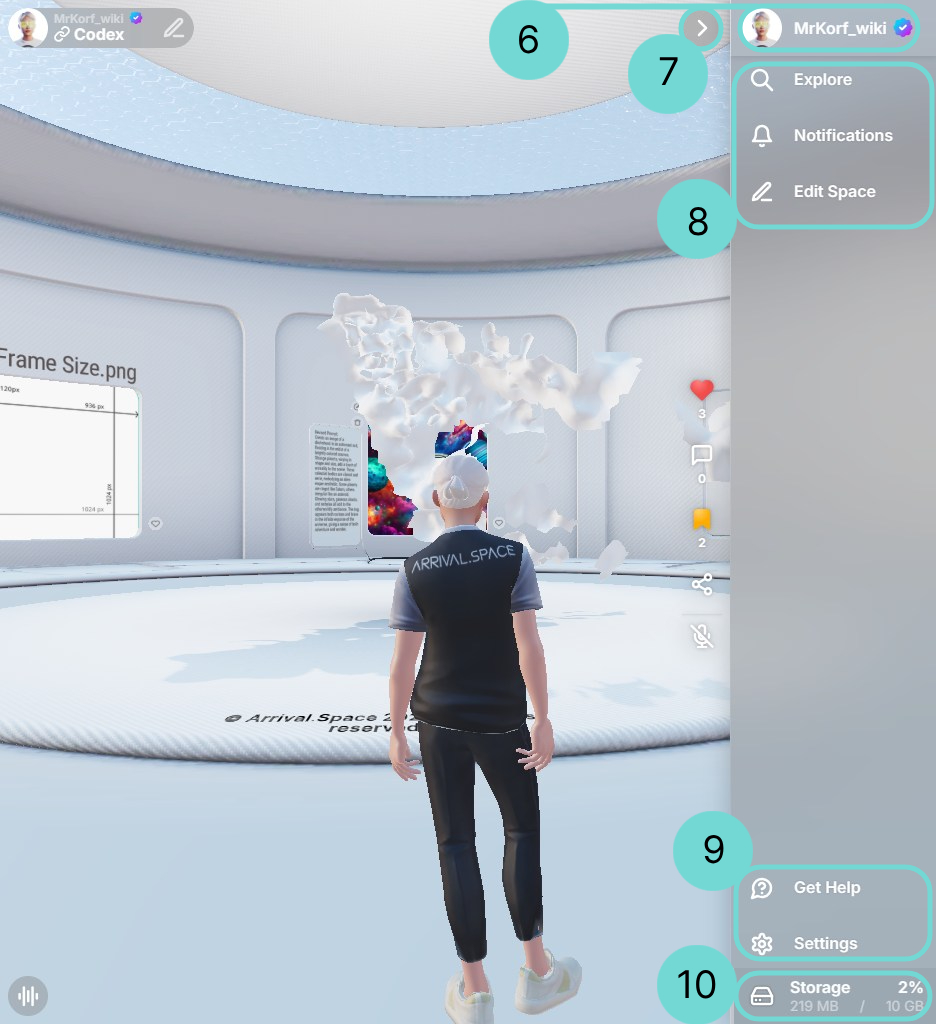
6Profile
Click on your username or profile image to open your Profile Index Card. More detailed information follows in section Profile Index Card.
8Explore - Manage - Edit
The following buttons are located at the top of the side panel so that you have a good overview and can manage them easily:
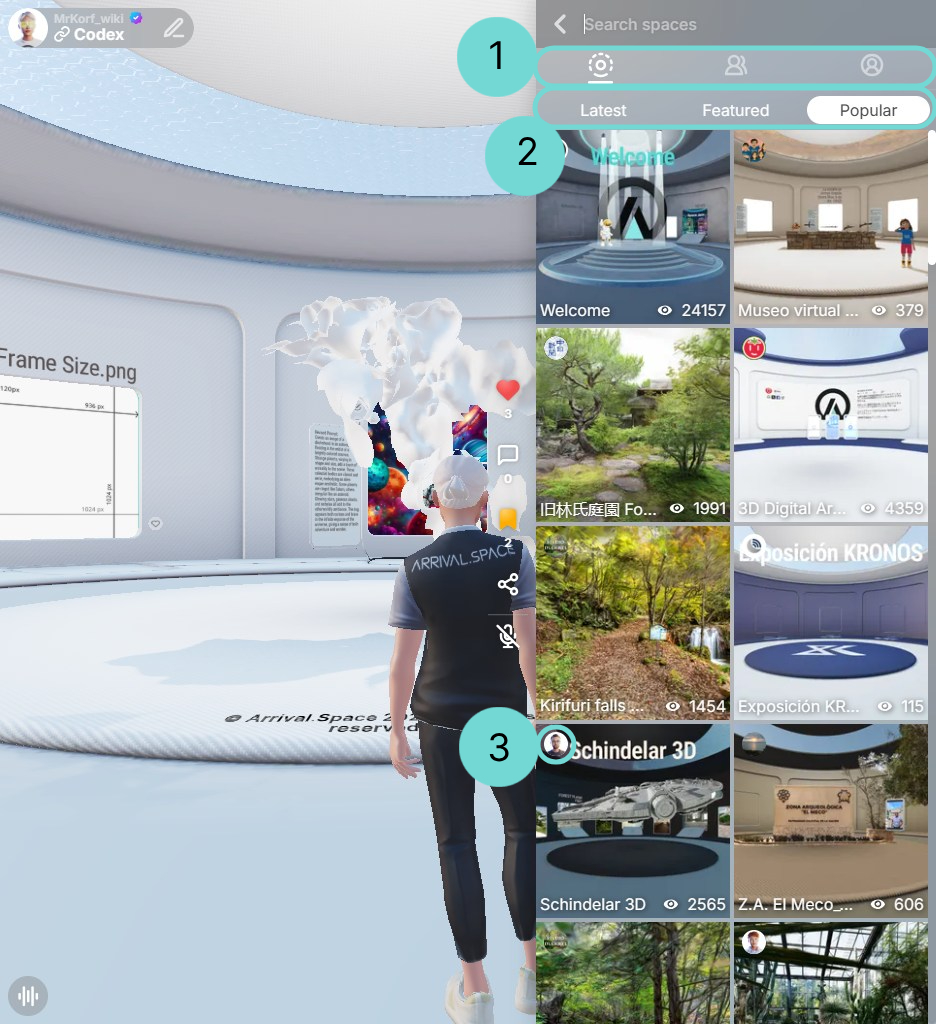
ExploreBy using this you can discover all public spaces. Link-only or private spaces are not searchable. You can also find creators by their username. There are three different tabs1 with different filter possibilities 2:
- Explore Spaces
Latest: The Spaces will be sorted by modification date. Especially if you want to find new Spaces, it is the easiest way to explore them.
Featured: These Spaces are specified by the system. It serves to display interesting spaces.
Popular: This filter sorts the spaces by views. Spaces which are most visited in the last 24 hours will be displayed. - Explore Creators
- Private Space Search
Modified: Your Spaces will be sorted by modification date.
Popular: This filter sorts your spaces by views.
When searching for a space, the creator’s profile picture or RPM image appears in the upper-left corner3 of the search results. Clicking the image opens the creator’s profile.
NotificationThe bell opens an overview of your Notifications. There you can view all visitors, messages, and reactions. The red dot by the bell indicates that new notifications are waiting for you.
Edit SpaceUse the Edit Space button to open the Edit Space UI. You will find a detailed explanation in section Customize your Space.
9Additional
Additional options can be found in the lower half of the side panel.
Get helpThis button launches the Feedback menu, where you can report bugs, suggest improvements, flag inappropriate content, or just give us your feedback.
SettingsThe settings allows you to manage all personal options like Account settings, Profile customization, Notification management, Performance settings and helpful external links. You will find more about these in the sections Performance, External Notifications and Manage your Settings.
10Total Storage
The total storage is an overview of the total storage used by all Spaces. It serves as an overview of how much storage space is still available. For more information please go to section Storage.
Controls
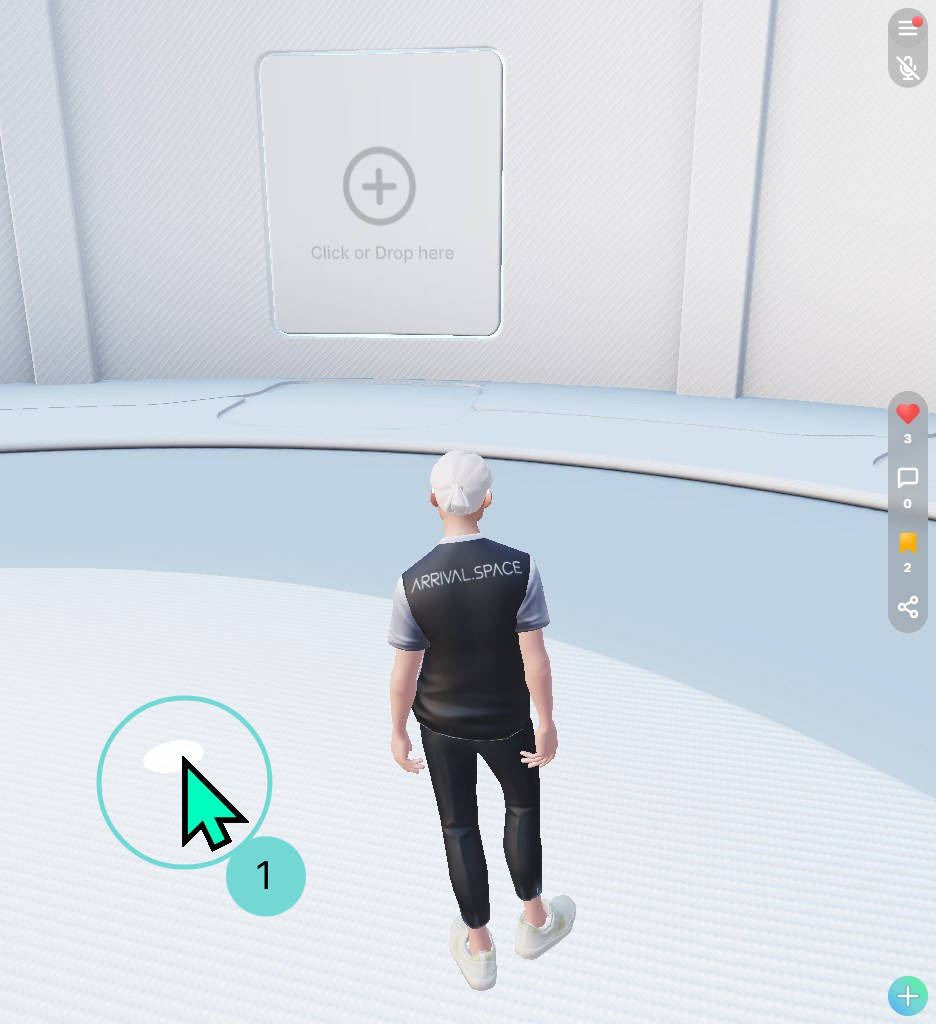
1Tap/Click to walk
You can use the mouse to click on the floor and move to the marked point. It also works mobile with a single tap. The point you are hovering over is highlighted with a circle.
Desktop
- Keyboard Controls
- Mouse Controls
- Combinations
Shift RunHold shift for running.
W Move forwardsMove your avatar forwards.
A Move leftMove your avatar to the left.
S Move backwardsMove your avatar backwards.
D Move rightMove your avatar to the right.
Space JumpPress space to jump with your avatar.
ESC Escaping fixed view modeUse ESC to leave the fixed viewpoint control, which is reached with a right mouse click or to exit the UI.
V Switch View ModeUse the V key to change the current view mode.
F Free Camera ModeEnter/Leave free camera mode.
H Hide UIHides all UI Control elements.
PointPoint at the floor to click and move. Point at a main portal to enter it. Click on items to select them.
Enable fixed view modeBy clicking the right mouse you can fix your view mode. That mean's that you could move around your mouse to change the view.
Shift + Edit accelerateAs soon as you enter the free camera mode, you can use the wheel in combination with the shift to control the acceleration of the movement.
For best performance, use the Google Chrome browser or alternatively any Chromium-based browser such as Edge, Opera, etc.
Mobile
- Tap Control
- View Control
Move / Drag to moveUse the joystick to move around. The further away the joystick is from the original position, the faster you move.
Move to pointTap on the floor to move your avatar to a certain point - it is highlighted with a circle on the ground.
JumpDouble Tap on your display to jump. It is also possible to jump forward if you drag the joystick up.
Hold to change the viewDrag and move to change your view outside the joystick.
VR Control
Since different end devices are used, we distinguish between those that include a controller or joystick and those that do not. For VR headsets like the Apple Vision Pro, which are operated without a joystick, eye tracking must be set up.
To activate immersive mode, click the "Enter Immersive Mode" button that appears at the top center of the screen.
- Without Controllers
- With Controllers
Move / Teleport When you look at the floor, you see a highlighted circle again. Use this and the pinch movement (pinch 2 fingers together) to teleport to the desired point.
Grab ElementPortals, gates and various other UI elements are highlighted with a blue border. As soon as an element is detected, you can use the pinch movement to call up the function of the element. For example, you can use the portal or listen to a 3D Voicey.
Change ViewTo change the view, pinch 2 fingers together and swipe.
Focus ObjectUse the controller to select an object in the environment. Adjust the highlighted point by moving the entire controller.
Select ObjectPress the button on the back of your controller (trigger button) to choose an object . Just make sure you're focusing at the object before you press it.
+TeleportAim the controller at the floor to highlight a spot. Press the trigger button to teleport.
Change ViewUse the right joystick to change your view. Push it in the direction you want to look. By holding the trigger button of the controller you can view "slower".
MoveUse the left joystick to move around. Push it in the direction you want to go.
Exit Immersive ModePress the menu button to exit immersive mode. Depending on your headset, it either exit immediately or prompt you to confirm before leaving.
VR mode is designed for viewing only and does not support editing.