Edit Gates
This section dives into the powerful world of Gates! You'll learn about the two distinct Gate types we offer, discover the intuitive process of editing them, and explore the exciting possibilities for displaying diverse media. We'll also provide a comprehensive walkthrough of every setting and field within the Gate editor, ensuring you understand exactly how to customize each element to your specific needs.
Gate Types

We offer two distinct types of Gates: 1 static Gates and 2 dynamic Gates. While both are designed to display content, they differ in functionality and use cases. Here’s a quick comparison to highlight the key differences:
| Feature | Static Gates | Dynamic Gates |
|---|---|---|
| Location | Predefined within the Space's structure | Can be placed anywhere within the Space |
| Size | Optimized for 936 x 1024 dimensions | Designed for a 2:1 aspect ratio but resizable |
| Ramps | Adding a link automatically creates a visual ramp leading to the Gate | No visual ramp change based on links |
| Deletes the content displayed on the Gate | Deletes the entire Gate structure |
Gates
A Gate provides an additional Space to showcase your content. You can use Gates to link to other Spaces, display images, embed websites, and much more. As such, they are likely to be one of the first features you'll want to utilize.
First, you'll need to open the Edit Gate UI. Here's a quick overview of the icons you'll see outside of the Gate UI:
Clicking this Edit Gate icon will open the Edit Gate UI, allowing you to modify the Gate's content and settings. Alternatively, hovering your mouse next to the icon will display a simplified, one-line editing interface.
Delete Gate Content or Delete Gate 26For static Gates, this Trash icon is located on the right side of the Gate. Clicking it will remove the content currently displayed on that Gate. 2
For dynamic Gates, the same Trash icon is also on the right side. However, clicking it here will delete the entire dynamic Gate structure, not just its content.6
Like Gates 3Clicking this Like icon allows you to express your appreciation for a Gate. Currently, this feature is only available for static Gates.
Open Gizmo 5This Gizmo icon appears exclusively for dynamic Gates. Clicking it opens the Gizmo tool, which allows you to reposition, rotate and scale your dynamic Gate within the Space. Refer to this link for detailed instructions on using the Gizmo.
Placing dynamic Gates
Action ButtonLocate the Action Button in the bottom right corner. Clicking this button will open a submenu with further options. Select Gate from this submenu. You will now have a dynamic Gate "in your hand," ready to be placed anywhere within the Space. By clicking on the right side of the mouse you will cancel the dynamic Gate placement.
Once created, three icons will appear on the left side of the dynamic Gate which are described in the section Gates.
Possible Content
You can upload the same wide range of content to Gates as you can to the Center Asset. Here's a summary of the supported file formats:
| Category | Supported formats |
|---|---|
| Gaussian Splats | PLY, SPZ, SPLAT |
| Mesh based | GLB, GLTF, FBX |
| Movies | mp4, mov |
| Images | png, jpg, gif |
| Audio | mp3 |
| Documents | pdf, pptx |
| HTML | Custom HTML code |
| Weblinks | Any valid website* |
*Please note that some websites prevent embedding. We appreciate your understanding that not all websites can be displayed inside Gates.
While you can upload FBX and GLTF files, our system will automatically convert them to the GLB format. This conversion process can impact the visual quality of your asset. For optimal results, we recommend converting your 3D models to GLB using dedicated software like Blender before uploading.
To embed social media posts, please navigate to the Social Media Content section.
Seamlessly connect Scenes
In addition to the space spawn point, you can spawn your visitors in front of a dynamic gate. This allows scenes to be connected even more seamlessly. You can link static gates to dynamic gates, as well as connect dynamic gates with other dynamic gates.
Before Connection
The dynamic gate in the target space must be placed before. Please add a title to the Gate to find it. The target gate can also be pre-filled with other content, such as an image or a link to a website.
Connecting Gates
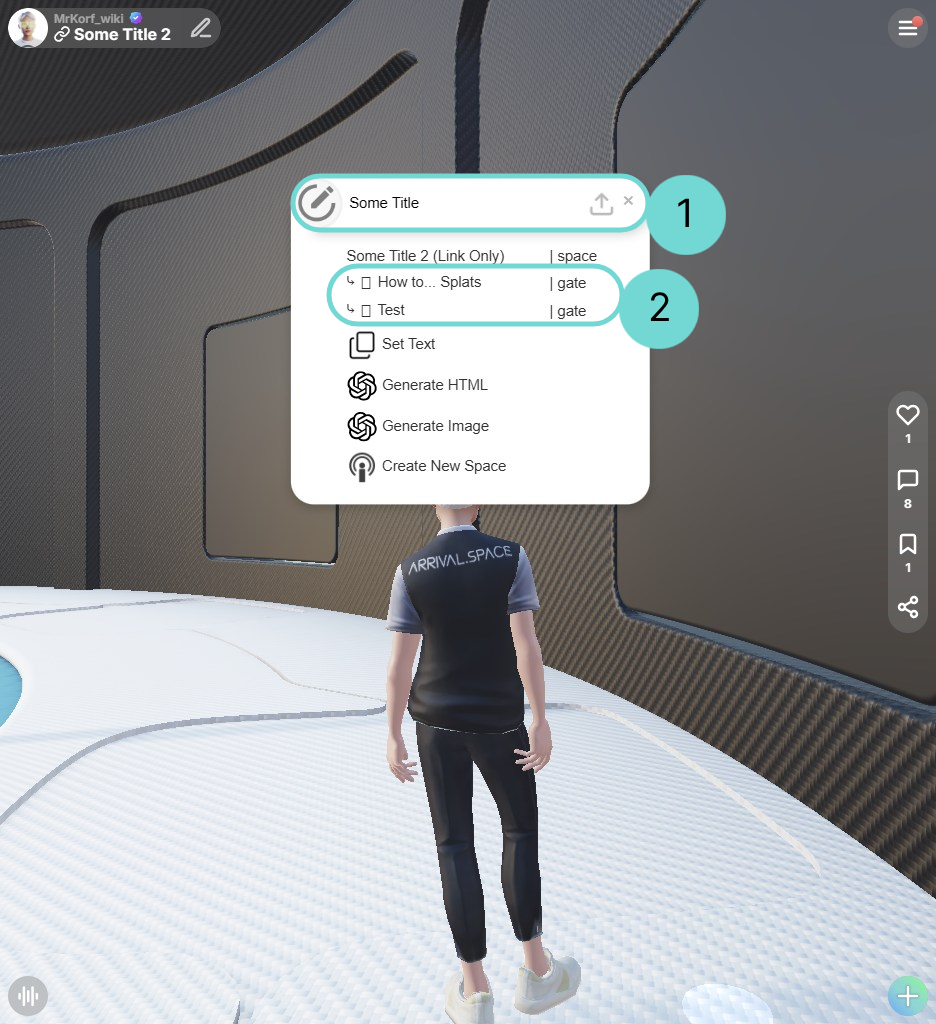
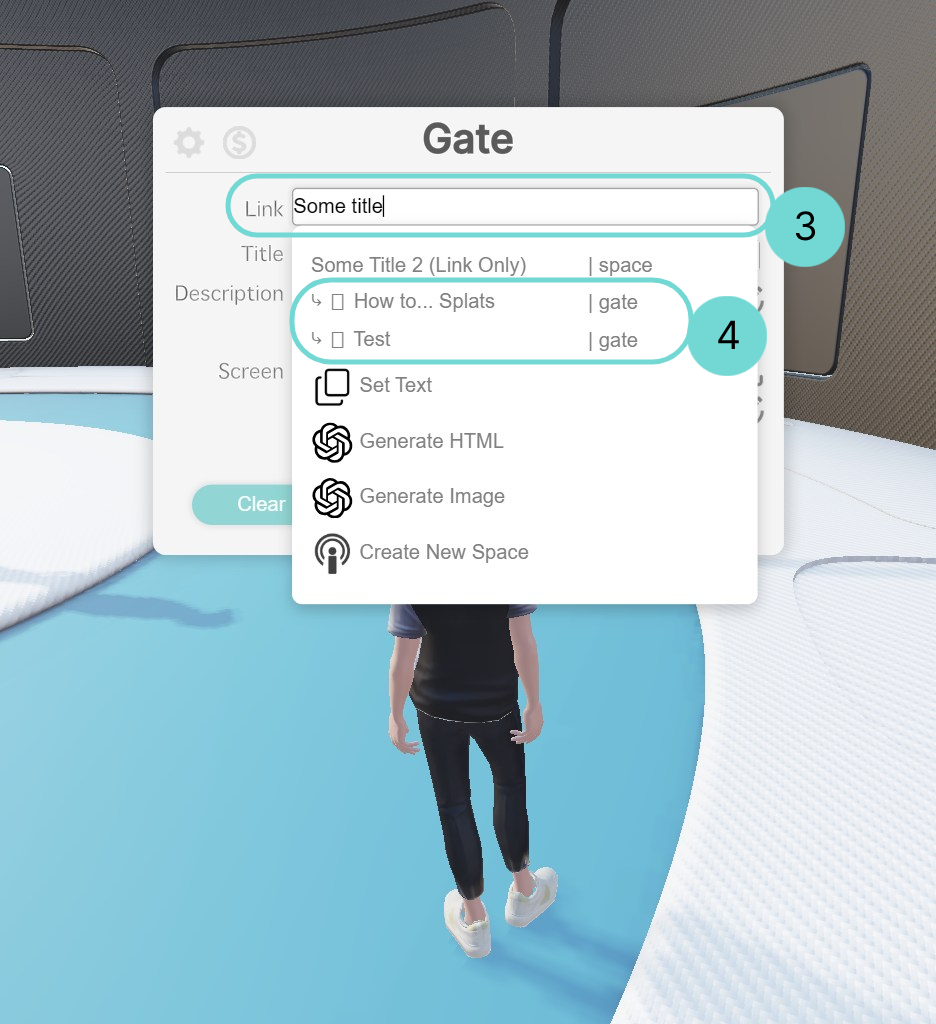
When you enter a Space name in the Single Line UI 1, which appears when you are next to a gate, or in the Link field of the Edit Gate UI 3, a list of all existing dynamic gates will appear 2 4.
Simply select the desired gate from the list, and your gate will automatically be populated with a screenshot of the target space.
Updating Gate Screenshot
To ensure the gate’s screenshot displays correctly and no longer shows the original spawn point of the space, follow these steps:
- Enter the newly created gate that is linked to the dynamic gate in another space.
- After spawning in the new space, use the browser’s back button to return to the original space.
This process will update the preview image both on the loading screen and within the gate.
The source gate does not have to use the preview screenshot. Every field within Edit Gate UI can be filled in and have nothing to do with the target gate, except for the link field. It is therefore also possible to use your own image as a screen, but this does not affect the loading screen.
Example: Updating Gate Preview
Aim: Link the gate in Some Title 2 to the Splat manipulation space and spawn right in front of the Target gate.
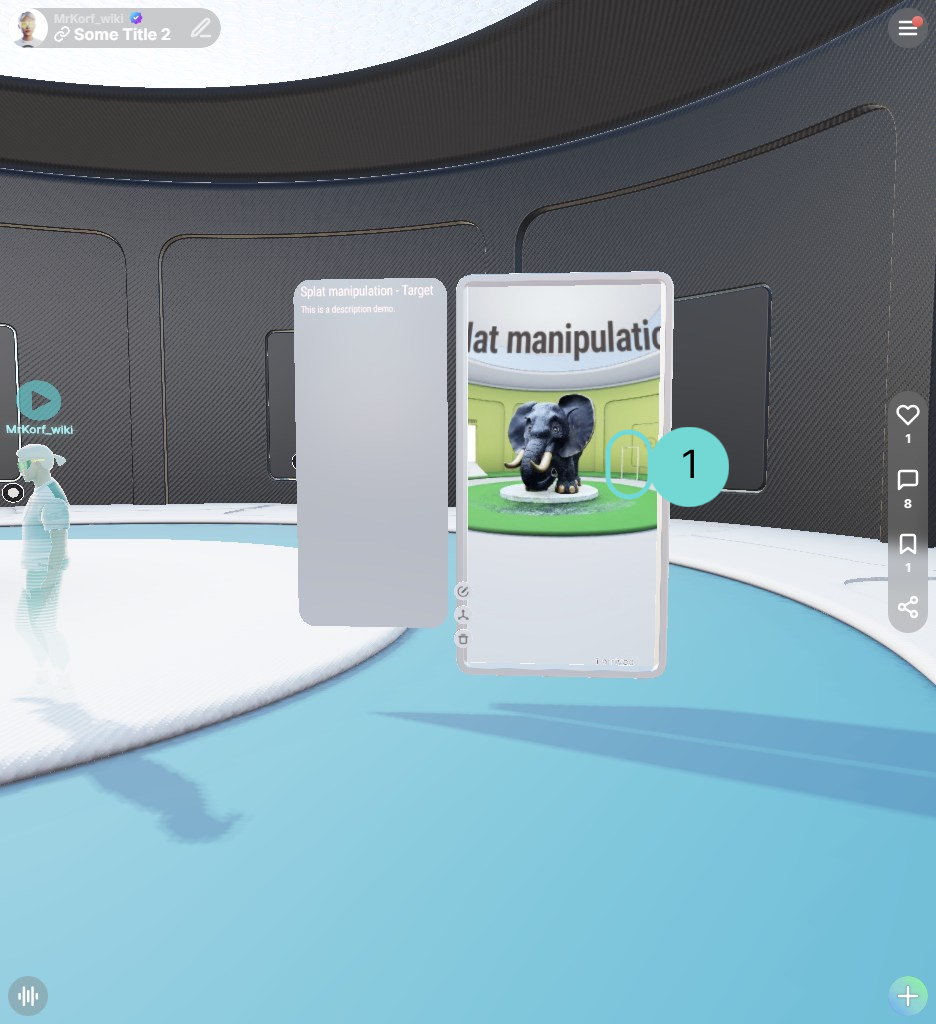
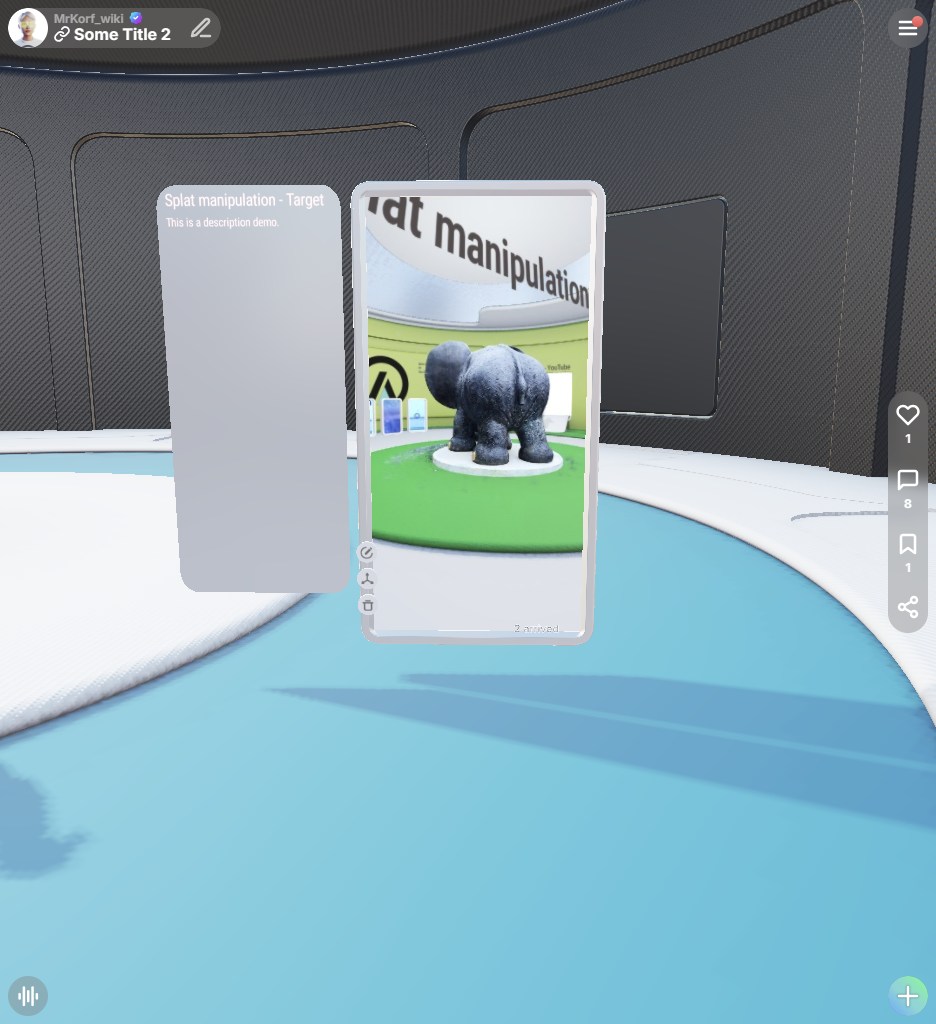
The left image shows the initial state, where you can see the space screenshot with the “Target” gate in the background.
The right image shows the final state, after I entered the gate and returned using the “Browser Back” button. The screenshot has been refreshed and now shows the view of the gate on the asset.
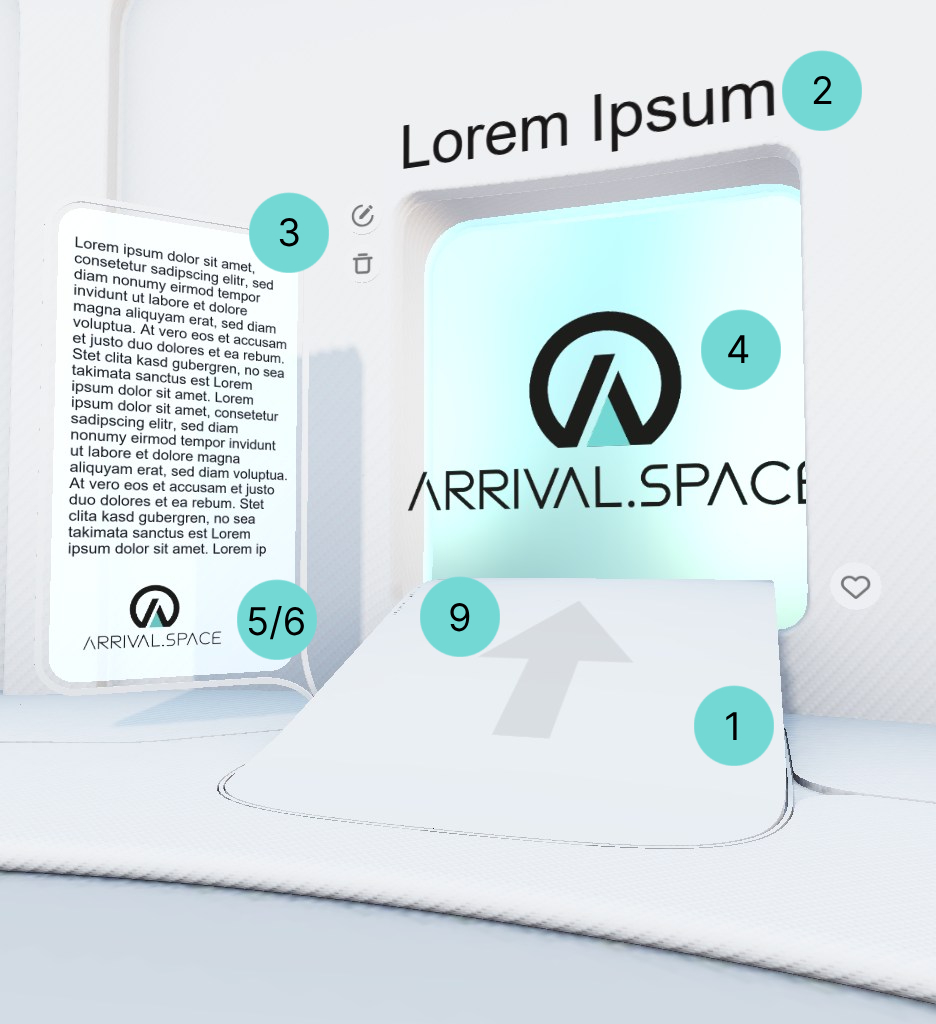
Edit Gate UI
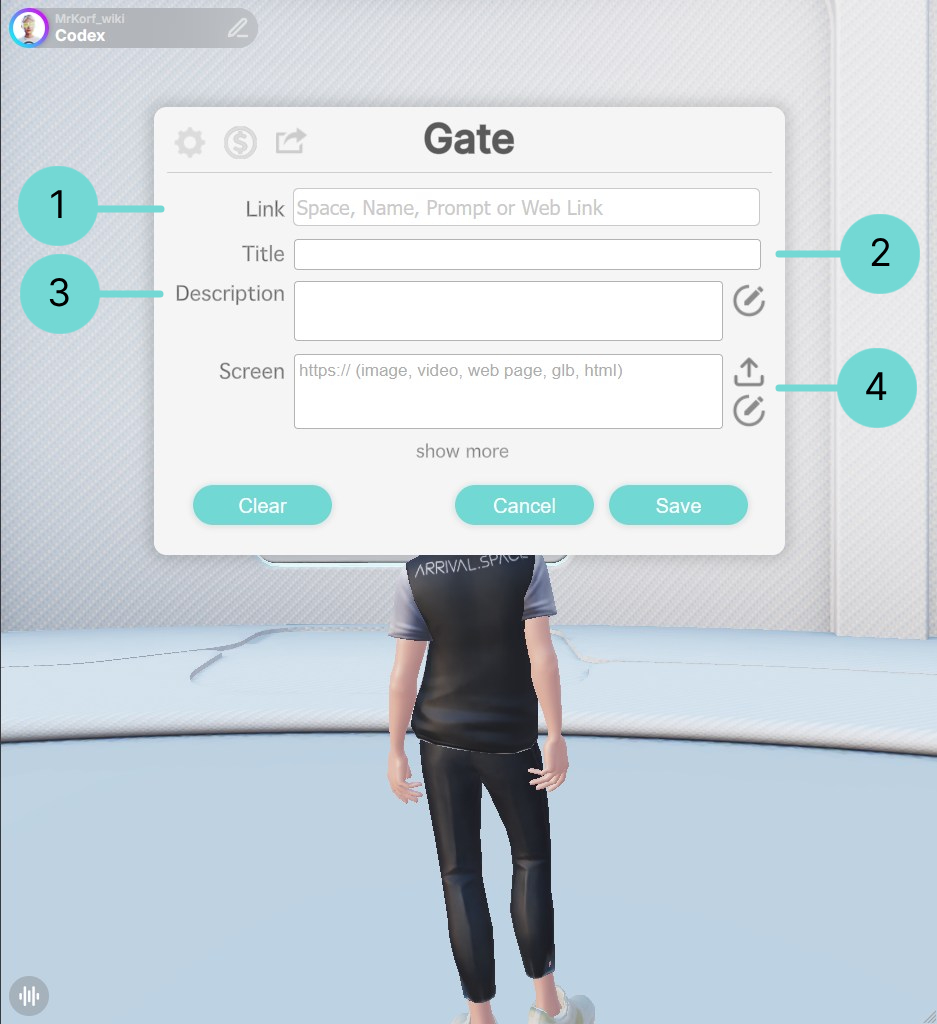
1Link
Pasting a web link into this field transforms your Gate into a doorway. Entering a linked Gate will either display the linked 2D content in fullscreen mode or transport you to another Space/Webpage.
Please note that dynamic Gates currently do not visually indicate that they contain an enterable link.
2Title
Enter a title for your Gate in this field. The title will be displayed directly above the Gate. Use Shift + Enter to create line breaks within the title.
3Description
The description you enter here will appear on the left side panel of the Gate. Use this Space to provide detailed information about the Gate's content or any relevant notes. The description is limited to about 600 characters depending on the font-size, line breaks and so on. It doesn't support manual line breaks. If you paste text exceeding this limit, the extra characters will overflow the description.
Clicking the Edit button will open a secondary, small editor. This basic editor allows for simple text formatting. You can also format the text using HTML. However, be aware that using HTML will override the default text and wall color settings for this Gate, requiring you to define colors, font sizes, etc., directly within your HTML code.
open HTML editor4Screen
The Screen functionality operates independently of the Link field, except when displaying embedded content like YouTube videos. Otherwise, you can use the Screen to display content that is separate from the linked destination.
Importantly, you can display multiple content items within a single Screen. For example, you can upload a PNG image and a PowerPoint presentation. When multiple items are present, navigation arrows will appear next to the Gate, allowing creators to switch between the different content.
LinkIf a Link is used for the Screen and you click on , a link overview will open. Inside this overview you can reorder or delete your links. To add another link use the Link icon. You can also use the file upload icon for uploading a pdf or something else to your screen.
If you want to display a website along with additional content in a gate, it’s best to first add the website using the Link option. Then, use the icon to the right of the Screen input to add the rest of your content.
If you have multiple websites to include, click the icon next to the Screen input. In the window that opens, use the link icon to add the additional URLs.
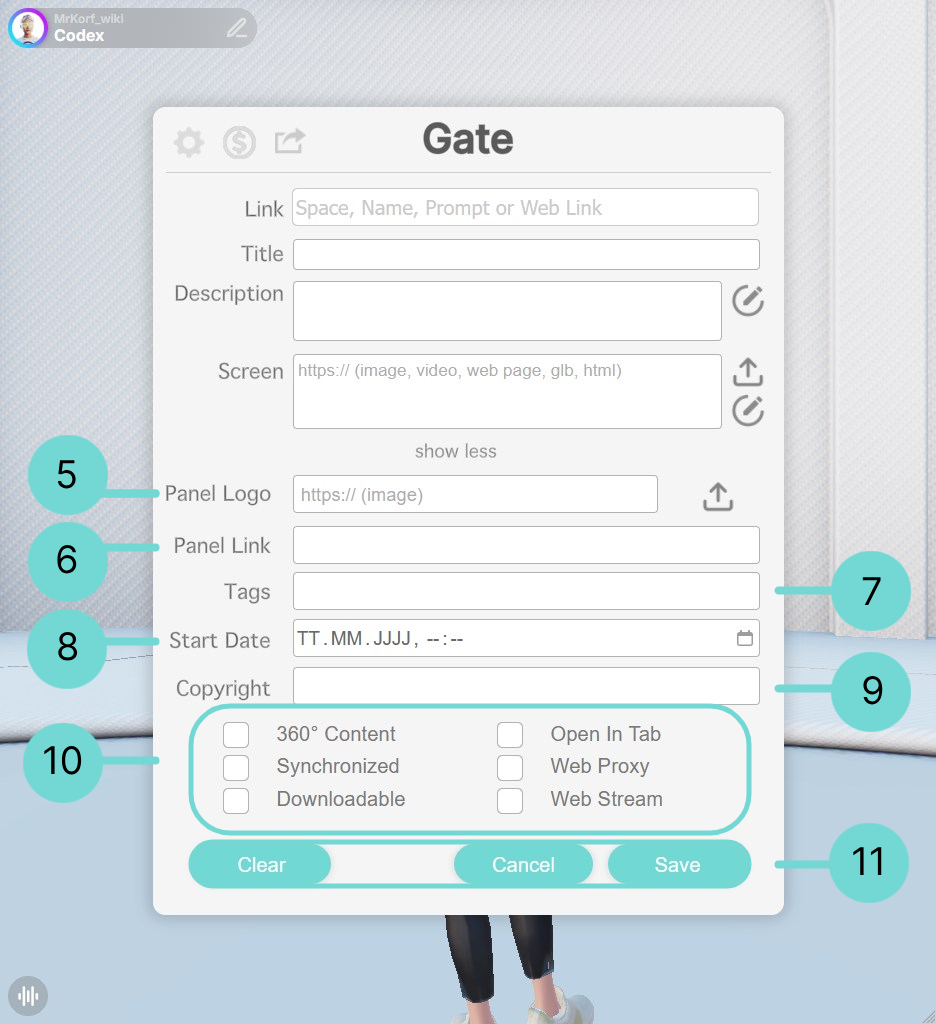
56Panel Logo & Panel Link
These two fields are designed for branding purposes. You can easily upload a logo image and link it to a website. The logo will be displayed at the bottom of the description panel, and clicking it will open the linked website in a new browser tab.
7Tags
Add relevant tags to your Gates to categorize your content, making it easier to find and manage. (This feature is not yet available.)
8Start Date
Here, you can set a specific date and time for when the Gate's content will become active and visible to creators. Currently, a timer at the top of the Gate panel will count down to the set time. Future updates will introduce the functionality to lock Gates until this timer expires. (This feature is not yet available.)
9Copyright
Use this field to add copyright information to your data. This information will be displayed on the ramp leading to the Gate, so ensure a ramp is present if you utilize this field.
10Checkboxes
- 360° Content: Enable this option for videos to allow creators to pan and zoom the view using their mouse when inside the Gate.
- Synchronized: Activate this to synchronize the content playback or viewing experience with other creators currently in the Space. This feature works for YouTube videos, uploaded videos, presentations, and documents.
- Downloadable: Enabling this option will add a download button to the Gate's description, allowing creators to download the Screen content to their device. Do not use it together with the panel logo, otherwise there will be an overlap.
- Open in Tab: This option applies to the Link field. If you want the linked content to open in a new browser tab, activate this setting.
- Web Proxy: The web proxy will be activated automatically when necessary to display web content. If a page is not displaying correctly, try disabling the proxy using the option below.
- Web Stream: This option is useful for collaborative browsing of websites with other creators in the Space. You will be able to see their interactions on the page, and they will be able to see yours. This can sometimes provide a workaround for embedding websites that do not normally allow it.
11Furthermore Buttons
Currently, you need to manually save your changes by clicking the Save button. Additionally, a Clear button is available to remove the current content associated with the Gate. This is particularly helpful when editing dynamic Gates.
Example: Filled Gate