Space Edit -Pro
This section outlines the additional features available exclusively to Pro customers. These advanced tools give you greater control over your experience, including options to adjust lighting, enable collisions (even for animated assets), use and manipulate skyboxes, add an intro sound, hide titles, and customize aliases.
ResetAs soon as you change a value from its original setting, this icon will appear, allowing you to reset it.
Pro Tab
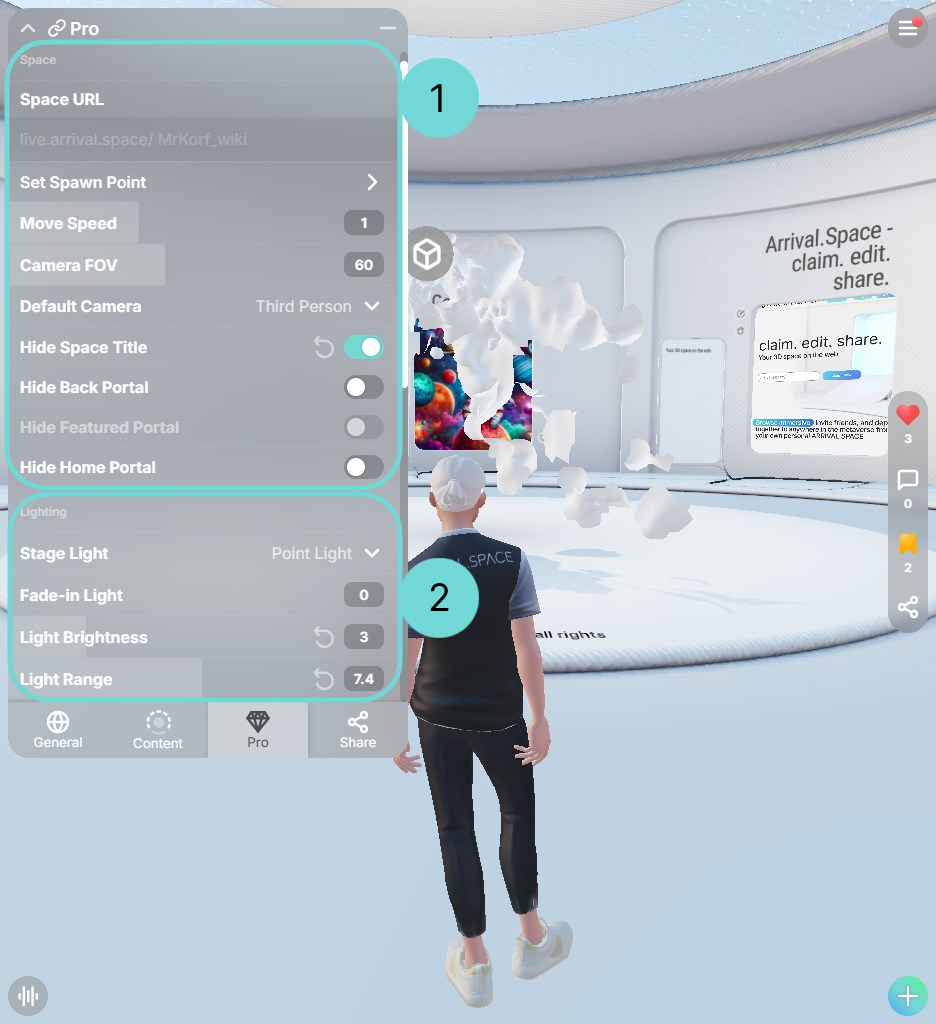
1Space Settings
Here you can find out more about some specific Space settings like changing alias or setting a custom screenshot position.
- Space Alias: Use this to change your alias. The alias is the Part of the URL after the slash. For example:
https://arrival.space/12345678. In this case you change12345678. - Set Spawn Point: By clicking on this button you will set the custom spawn point to your current position. This will set your Screenshot position at the Spawn point position. If you want to change this go to section (Custom Screenshot position)[/edit/space-adaption-pro#custom-screenshot-position].
- Move Speed: Use this slider to change the movement speed of all visitors and owners in a space.
- Camera FOV: The Field of view adapts the distance of the camera. Greater numbers result in a wider perspective. On mobile devices, the field of view is set to
+10by default. So if you set40as the FOV, it will be set to50on mobile devices to optimize the experience. - Default Camera: Select the preferred Camera Mode for your space. Choose between
first,third, orfreecamera perspectives. The predefined camera mode is 'third'. - Hide Space Title: This toggle lets you hide the Space title. If you disable the architecture, the title will automatically be hidden.
- Hide Back Portal: The back portal will be hidden if you use this toggle.
- Hide Home Portal: Disable the home portal by enabling this toggle.
Currently the Custom Spawn Point also changes the screenshot position. You can change your screenshot position separately.
2Lightning
This chapter will guide you through each lighting parameter and describe their impact.
- Stage Light: Adjust the kind of light with the drop-down menu. We prepared point(default), stage light and directional light.
- Fade-in-Light: Define a number that specifies the time until the light reaches 100 percent.
- Light Brightness: Edit this to change the intensity of the light.
- Light Range: Change the range of the stage light.
- Light Rotation: Rotates center lightning.
Change the kind of Light to "directional". There it works the best.
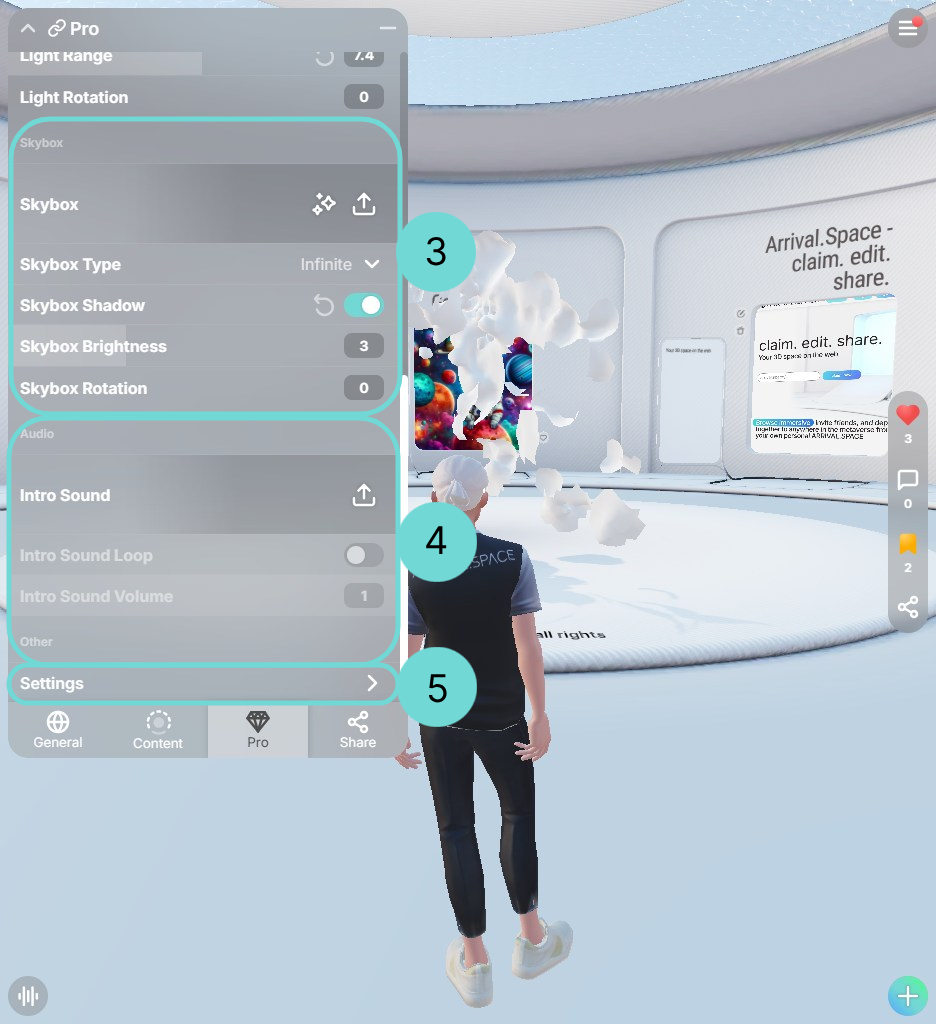
3Skyboxes
A skybox uses a cube map, which is a set of 6 images, placed behind your scene. It influences the mood/light of an object and the environment light. This works with a broader spectrum of light and colors which is used in the .hdr format.
- Skybox: Upload a
.hdrfile or let us generate a file for you. - Skybox Type: Change the type of a skybox via the drop-down. You can decide between Dome, Box or Infinity (default).
- Skybox Shadows: Add shadows of dynamic objects on the skybox.
- Skybox Brightness: Defines the brightness of the skybox.
- Skybox Rotation: Let you rotate the skybox.
Change the kind of Light to "directional". There it works the best.
4Intro Sounds
You can add an ambient intro sound to your Space. It will be played once and immediately muted if someone uses the microphone or watches a video inside a Gate. You can upload every .mp3 file you want, as long as it is yours.
- Loop: Use this option to continues play your uploaded file
- Volume: Change the volume of your sound file.
It is a better idea to add this kind of sound via Sound Entities.
5Settings
Some of the pro features are not implemented in the UI right now. Therefore at the bottom of the Edit Space UI you can find the Settings button. This will open a JSON Editor, where you can paste in parameters which you will get sent via E-Mail.
Advanced Customization via JSON Editor
The following settings can only be modified using the JSON Editor.
Heads up! Open This accordion to see a description.
A JSON file is like a list of information stored in key-value pairs, such as:
{
  "name": "Anna",
  "age": 28
}
This means: name is "Anna", and age is 28.
JSON Rules
- Use curly braces
{}to wrap the data. - Keys must be in double quotes (left side).
- Values can be text, numbers, booleans (
true/false), lists([]), or other objects({}). - Each line ends with a comma, except the last one.
Example: Adding a new Screenshot position
Before:
{
  "roomTitle": "Some Title",
  "roomDescription": "Some description",
  "roomPrivacy": "Open"
}
After:
{
  "roomTitle": "Some Title",
  "roomDescription": "Some description",
  "roomPrivacy": "Open",
  "customScreenshotPosition":
  {
    "x": 5,
    "y": 2.1,
    "z": 0.27
  }
}
Enable/Disable Floor Collision
The disableFloorCollision setting controls how ground collision is handled and should be used with care. It supports three states:
- Not set (value absent): The system uses the last known valid collision as a fallback to fill gaps. This is the safest and default behavior, helping prevent users from landing outside the splat. However, it may cause floating if the fallback surface is higher than expected.
true: Disables all system-generated ground collision. Only your custom collision will be used. Use this only if your collision is accurate and fully covers all required areas.false: Enables your custom collision, but the system will still fill gaps with its own ground collision. Depending on the splat setup, this can result in users falling through or landing in unintended places.
Best Practice:
If you’ve uploaded or generated a custom collision, you typically don’t need to set the disableFloorCollision value at all. Leaving it unset allows the system to intelligently fall back to the last known collision when needed—this provides the most reliable and balanced behavior in most cases.
Use true and false cautiously—both can introduce unexpected issues if the custom collision isn’t comprehensive.
Example:
...
"disableFloorCollision": true,
...
Custom Screenshot Position
Sometimes 3D elements block the camera view. To reposition the screenshot camera, manually adjust the x, y, and z coordinates.
Set a spawn point first, copy its coordinates (excluding azimuth), and paste them into your screenshot position.
Example:
...
"customScreenshotPosition": {
  "x": 5,
  "y": 2.1,
  "z": 0.27
},
...
Customize AI
Personalize your AI assistant using the following options:
- customAssistantVoice: Set the assistant’s voice (see available options).
- customAssistantRPM: Set a
.glbavatar file for appearance. - aiInputTitle: Change the title above the input field.
- aiInputFooter: Update the text below the input field.
- aiAnswerName: Change the displayed name of Mr. Korf.
Example:
...
"customAssistantVoice": "alloy",
"customAssistantRPM": "https://dzrmwng2ae8bq.cloudfront.net/71585765/0d5cd9f9607d7860867a95122a36e5282cb3943281fdcbf9e458a4e04c318632_sample-37-.glb",
"aiInputTitle": "Ask the evil..",
"aiInputFooter": "Sometimes you get an answer...",
"aiAnswerName": "Prof Roboto",
...